|
|
|
Writing ActiveX ControlsBesides using existing ActiveX controls in Delphi, you can easily develop new ones, using one of two techniques:
In either case, you can optionally prepare a property page for the control, to use as a sort of property editor for setting the initial value of the control's properties in any development environment—an alternative to the Object Inspector in Delphi. Because most development environments allow only limited editing, it is more important to write a property page than it is to write a component or property editor for a Delphi control. Building an ActiveX ArrowAs an example of the development of an ActiveX control, I've decided to take the Arrow component from Chapter 9, "Writing Delphi Components," and turn it into an ActiveX control. You cannot use that component directly, because it is a graphical control (a subclass of TGraphicControl). However, turning a graphical control into a window-based control is usually a straightforward operation. In this case, you change the base class name to TCustomControl (and change the name of the control's class to TMdWArrow, as well, to avoid a name clash), as you can see in the source code files in the XArrow folder. After installing this component in Delphi, you are ready to begin developing the new example. To create a new ActiveX library, select File ® New ® Other, move to the ActiveX page, and choose ActiveX library. Delphi creates the bare skeleton of a DLL, as you saw at the beginning of this chapter. I've saved this library as XArrow, in a directory with the same name, as usual. Now it is time to use the ActiveX Control Wizard, available in the ActiveX page of the Object Repository—Delphi's New dialog box: 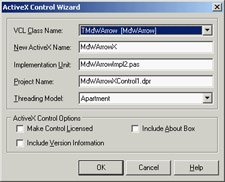
In this wizard, you select the VCL class you are interested in, customize the names shown in the edit boxes, and click OK; Delphi then builds the complete source code of an ActiveX control for you. The use of the three check boxes at the bottom of the ActiveX Control Wizard window may not be obvious. If you make the control licensed, Delphi will include a license key in the code and provide this same GUID in a separate .LIC file. This license file is necessary to use the control in a design environment without the proper license key for the control or use it within a web page. The second check box allows you to include version information for the ActiveX control in the OCX file. If the third check box is selected, the ActiveX Control Wizard automatically adds an About box to the control. Look at the code the ActiveX Control Wizard generates. This wizard's key element is the generation of a type library and, of course, a corresponding type library import unit with the definition of an interface (dispinterface) and other types and constants. In this example, the import file is named XArrow_TLB.PAS: I suggest you study it to understand how Delphi defines an ActiveX control. The unit includes a GUID for the control, constants for the definition of values corresponding to the COM enumerated types used by properties of the Delphi control (like TxMdWArrowDir), and the declaration of the IMdWArrowX interface. The final part of the import unit includes the declaration of the TMdWArrowX class. This is a TOleControl-derived class you can use to install the control in Delphi, as you saw in the first part of this chapter. You don't need this class to build the ActiveX control; you need it to install the ActiveX control in Delphi. The rest of the code, and the code you'll customize, is in the main unit, which in the XArrow example is called MdWArrowImpl1. This unit has the declaration of the ActiveX server object, TMdWArrowX, which inherits from TActiveXControl and implements the specific IMdWArrowX interface. Before you customize this control, let's see how it works. Compile the ActiveX library and then register it using Delphi's Run ® Register ActiveX Server menu command. Now you can install the ActiveX control as you've done in the past, except you have to specify a different name for the new class to avoid a name clash. If you use this control, it doesn't look much different from the original VCL control, but the same component can now be installed in other development environments. Adding New PropertiesOnce you've created an ActiveX control, adding new properties, events, or methods to it is—surprisingly—simpler than doing the same operation for a VCL component. Delphi, provides specific visual support for adding properties, methods, or events to an ActiveX control, but not for a VCL control. You can open the Delphi unit with the implementation of the ActiveX control, and choose Edit ® Add To Interface. As an alternative, you can use the same command from the editor's shortcut menu. Delphi opens the Add To Interface dialog box: 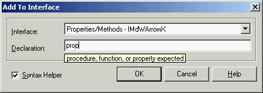
In the combo box, you can choose between a new property, method, or event. In the edit box, you can then type the declaration of this new interface element. If the Syntax Helper check box is activated, you'll get hints describing what you should type next and highlighting any errors. When you define a new ActiveX interface element, keep in mind that you are restricted to COM data types. In the XArrow example, I've added two properties to the ActiveX control. Because the Pen and Brush properties of the original Delphi components are not accessible, I've made their color available. These are examples of what you can write in the Add To Interface dialog box's edit box (executing it twice): property FillColor: Integer; property PenColor: Integer;
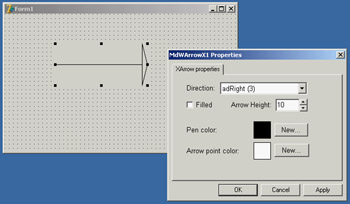
The declarations you enter in the Add To Interface dialog box are automatically added to the control's type library (TLB) file, to its import library unit, and to its implementation unit. All you have to do to finish the ActiveX control is fill in the Get and Set methods of the implementation. If you now install this ActiveX control in Delphi once more, the two new properties will appear. The only problem with this property is that Delphi uses a plain integer editor, making it difficult to enter the value of a new color by hand. A program, by contrast, can easily use the RGB function to create the proper color value. Adding a Property PageAs it stands, other development environments can do very little with your component, because you've prepared no property page—no property editor. A property page is fundamental so that programmers using the control can edit its attributes. However, adding a property page is not as simple as adding a form with a few controls. The property page, will integrate with the host development environment. The property page for your control will show up in a property page dialog of the host environment, which will provide the OK, Cancel, and Apply buttons, and the tabs for showing multiple property pages (some of which may be provided by the host environment). The nice thing is that support for property pages is built into Delphi, so adding one takes little time. You open an ActiveX project, then open the usual New Items dialog box, move to the ActiveX page, and choose Property Page. What you get is not very different from a form—the TPropertyPage1 class (created by default) inherits from the TPropertyPage class of VCL, which in turn inherits from TCustomForm.
In the property page, you can add controls as in a normal Delphi form, and you can write code to let the controls interact. In the XArrow example, I've added to the property page a combo box with the possible values of the Direction property, a check box for the Filled property, an edit box with an UpDown control to set the ArrowHeight property, and two shapes with corresponding buttons for the colors. You can see this form in the Delphi IDE while working on the ActiveX control in Figure 12.9. The only code added to the form relates to the two buttons used to change the color of the two shape components, which offer a preview of the ActiveX control's color. The button's OnClick event uses a ColorDialog component, as usual:
procedure TPropertyPage1.ButtonPenClick(Sender: TObject);
begin
  with ColorDialog1 do
  begin
    Color := ShapePen.Brush.Color;
    if Execute then
    begin
      ShapePen.Brush.Color := Color;
      Modified; // enable Apply button!
    end;
  end;
end;
It's important to notice in this code the call to the Modified method of the TPropertyPage class. This call is required to let the property page dialog box know you've modified one of the values and to enable the Apply button. When a user interacts with one of the other controls on the form, this Modified call is made automatically to the TPropertyPage class method that handles the internal cm_Changed message. As a user, you don't change the buttons for these controls, however, you need to add this line yourself.
The next step is to associate the property page's controls with the ActiveX control's properties. The property page class automatically has two methods for this functionality: UpdateOleObject and UpdatePropertyPage. As their names suggest, these methods copy data from the property page to the ActiveX control and vice versa, as you can see in the example code. The final step is to connect the property page to the ActiveX control. When the control was created, the Delphi ActiveX Control Wizard automatically added a declaration for the Define-PropertyPages method to the implementation unit. In this method, you call the DefinePropertyPage method (this time the method name is singular) for each property page you want to add to the control. The parameter of this method is the GUID of the property page, which you can find in the corresponding unit: procedure TMdWArrowX.DefinePropertyPages( DefinePropertyPage: TDefinePropertyPage); begin DefinePropertyPage(Class_PropertyPage1); end; You've finished developing the property page. After recompiling and reregistering the ActiveX library, you can install the ActiveX control in a host development environment (including Delphi) and see how it looks, as I already did in Figure 12.9. ActiveFormsAs I've mentioned, Delphi provides an alternative to the use of the ActiveX Control Wizard to generate an ActiveX control. You can use an ActiveForm, which is an ActiveX control that is based on a form and can host one or more Delphi components. This technique is used in Visual Basic to build new controls, and it makes sense when you want to create a compound component. In the XClock example, I've placed on an ActiveForm a label (a graphic control that cannot be used as a starting point for an ActiveX control) and a timer, and connected the two with a little code. The form/control becomes a container of other controls, which makes it easy to build compound components (easier than for a VCL compound component). To build such a control, select the ActiveForm icon in the ActiveX page of the File ® New dialog box. Delphi will ask you for some information in the ActiveForm Wizard dialog box, which is similar to the ActiveX Control Wizard dialog box. ActiveForm InternalsBefore you continue with the example, let's look at the code generated by the ActiveForm Wizard. The key difference from a plain Delphi form is in the declaration of the new form class, which inherits from the TActiveForm class and implements a specific ActiveForm interface. The code generated for the active form class implements quite a few Set and Get methods, which change or return the corresponding properties of the Delphi form; this code also implements the events, which again are the events of the form. The TForm events are set to the internal methods when the form is created. For example: procedure TAXForm1.Initialize; begin OnActivate := ActivateEvent; ... end; Each event then maps itself to the external ActiveX event, as in the following method: procedure TAXForm1.ActivateEvent(Sender: TObject); begin if FEvents <> nil then FEvents.OnActivate; end; Because of this mapping, you should not handle the form's events directly. Instead, you can either add code to these default handlers or override the TForm methods that end up calling the events. This mapping problem relates only to the events of the form itself, not to the events of the form's components. You can continue to handle the components' events as usual.
The XClock ActiveX ControlNow that I've covered some foundations, let's return to the development of the XClock example:
Notice the effect of the sunken border. This is controlled by the active form's AxBorderStyle property, one of the few properties of active forms that is not available for a plain form. ActiveX in Web PagesIn the previous example, you used Delphi's ActiveForm technology to create a new ActiveX control. An ActiveForm is an ActiveX control based on a form. Borland documentation often implies that ActiveForms should be used in HTML pages, but you can use any ActiveX control on a web page. Basically, each time you create an ActiveX library, Delphi should enable the Project ® Web Deployment Options and Project ® Web Deploy menu items.
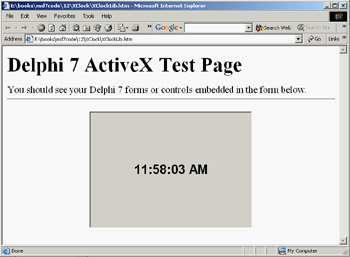
The first command allows you to specify how and where to deliver the proper files. In this dialog box you can set the server directory for deploying the ActiveX component, the URL of this directory, and the server directory for deploying the HTML file (which will have a reference to the ActiveX library using the URL you provide). You can also specify the use of a compressed CAB file, which can store the OCX file and other auxiliary files, such as packages, making it easier and faster to deliver the application to the user. A compressed file, means a faster download. I've generated the HTML file and CAB file for the XClock project in the same directory. Opening this HTML file in Internet Explorer produces the output shown in Figure 12.10. If all you get is a red X marker indicating a failure to download the control, there are various possible explanations for this problem: Internet Explorer doesn't allow the download of controls, it doesn't match the security level for the unsigned control, there is a mismatch in the control version number, and so on. Notice that in the portion of the HTML file referring to the control, you can use the special param tag to customize the control's properties. For example, in the XArrow control's HTML file, I've modified the automatically generated HTML file (in the XArrowCust.htm file) with these three param tags: <object classid="clsid:482B2145-4133-11D3-B9F1-00000100A27B" codebase="./XArrow.cab" width="350" height="250" align="center" hspace="0" vspace="0"> <param name="ArrowHeight" value="100"> <param name="Filled" value="-1"> <param name="FillColor" value="111829"> </object> Although this might seem to be a useful technique, it is important to consider the (limited) role of an ActiveX form placed in a web page. It corresponds to letting a user download and execute a custom Windows application, which raises many concerns about security. An ActiveX control can access the computer's system information, such as the user name, directory structure, and so on. I could continue, but my point is clear. |
|
||||||||||||||||||||||||||||||||||||||||||||||||||||||||||||||||||||||||||||||||||||||||||||||||||||||||||||||||||||||||||||||||||||||||||||||||||||||||||||||||||||||||||||||||||||||||||||||||||||
|