|
|
|
Writing an Automation ServerLet's begin by writing an Automation server. To create an Automation object, you can use Delphi's Automation Object Wizard. Begin with a new application, open the Object Repository by selecting File ® New ® Other, move to the ActiveX page, and choose Automation Object. You'll see the Automation Object Wizard: 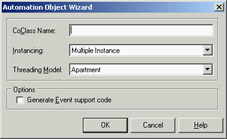
In this wizard, enter the name of the class (without the initial T, because it will be added automatically for you to the Delphi implementing class) and click OK. Delphi will now open the type-library editor.
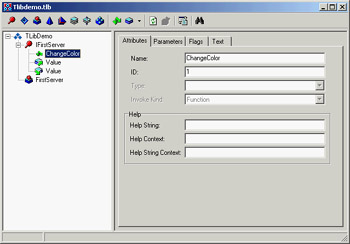
The Type-Library EditorYou can use the type-library editor to define a type library in Delphi. Figure 12.4 shows its window after I've added some elements to it. The type-library editor allows you to add methods and properties to the Automation server object you've just created or to a COM object that was created using the COM Object wizard. Once you do, it can generate both the type library (TLB) file and the corresponding Delphi language source code stored in a unit called a type library import unit. I have two relevant suggestions to let you work better with Delphi's type-library editor. The first and most simple is that if you right-click on the toolbar and turn on the Text Labels option you'll see in each toolbar button a caption with its effect, making the editor easier to use. The second more relevant suggestion is to go to the Type Library page of Delphi's Environment Options dialog box and choose the Pascal language radio button over the IDL language radio button. This setting determines the notation used by the type-library editor to display methods and parameters, and even to edit the types of the parameters of a method or the type of a property. Unless you are used to writing COM code in C or C++, you'd probably prefer thinking in terms of Delphi rather than in terms of IDL.
To build a first example, you can add a property and a method to the server by using the editor's corresponding toolbar buttons and typing their names either in the Tree View control on the left side of the window or in the Name edit box on the right side. You add these two elements to an interface, which I've called IFirstServer. For the procedure you'll be able to define the parameters in the Parameters page, for a function you'd also be able to set a return type in the same page. In this specific case the ChangeColor method has no parameters and its Delphi definition would be: procedure ChangeColor; safecall; Now you can add a property to the interface by clicking the Property button on the type-library editor's toolbar. Again, you can type a name for it, such as Value, and select a data type in the Type combo box. Besides selecting one of the many types already listed, you can also enter other types directly, particularly interfaces of other objects. The definition of the Value property of the example corresponds to the following elements of the Delphi interface: function Get_Value: Integer; safecall; procedure Set_Value(Value: Integer); safecall; property Value: Integer read Get_Value write Set_Value; Clicking the Refresh button on the type-library editor toolbar generates (or updates) the Delphi unit with the interface. The Server CodeNow you can close the type-library editor and save the changes. This operation adds three items to the project: the type library file, a corresponding Delphi definition, and the declaration of the server object. The type library is connected to the project using a resource-inclusion statement, added to the source code of the project file:
{$R *.TLB}
You can always reopen the type-library editor by using the View ® Type Library command or by selecting the proper TLB file in Delphi's normal File Open dialog box. As mentioned earlier, the type library is also converted into an interface definition and added to a new Delphi unit. This unit is quite long, so I've listed in the book only its key elements. The most important part is the new interface declaration:
type
IFirstServer = interface(IDispatch)
['{89855B42-8EFE-11D0-98D0-444553540000}']
procedure ChangeColor; safecall;
function Get_Value: Integer; safecall;
procedure Set_Value(Value: Integer); safecall;
property Value: Integer read Get_Value write Set_Value;
end;
Then comes the dispinterface, which associates a number with each element of the IFirstServer interface:
type
  IFirstServerDisp = dispinterface
    ['{89855B42-8EFE-11D0-98D0-444553540000}']
    procedure ChangeColor; dispid 1;
    property Value: Integer dispid 2;
  end;
The last portion of the file includes a creator class, which is used to create an object on the server (and for this reason used on the client side of the application, not on the server side):
type
  CoFirstServer = class
    class function Create: IFirstServer;
    class function CreateRemote(const MachineName: string): IFirstServer;
  end;
All the declarations in this file (I've skipped some others) can be considered internal, hidden implementation support. You don't need to understand them fully in order to write most Automation applications. Finally, Delphi generates a file containing the implementation of your Automation object. This unit is added to the application and is the one you'll work on to finish the program. This unit declares the class of the server object, which must implement the interface you've just defined:
type
  TFirstServer = class(TAutoObject, IFirstServer)
  protected
    function Get_Value: Integer; safecall;
    procedure ChangeColor; safecall;
    procedure Set_Value(Value: Integer); safecall;
  end;
Delphi already provides the skeleton code for the methods, so you only need to complete the lines in between. In this case, the three methods refer to a property and two methods I've added to the form. In general, you should not add code related to the user interface inside the class of the server object. I've done it because I wanted to be able to change the Value property and have a visible side effect (displaying the value in an edit box). Here you can see this form at design time:  Registering the Automation ServerThe unit containing the server object has one more statement, added by Delphi to the initialization section:
initialization
  TAutoObjectFactory.Create(ComServer, TFirstServer, Class_FirstServer,
    ciMultiInstance);
end.
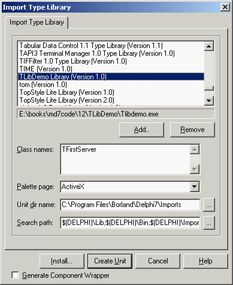
This is not very different from the creation of class factories you saw at the beginning of this chapter. The ComServer unit hooks the InitProc system function to register all COM objects as part of the COM server application startup. The execution of this code is triggered by the Application.Initialize call, which Delphi adds by default to the project source code of any program. You can add the server information to the Windows Registry by running this application on the target machine (the computer where you want to install the Automation server), or by running it and passing to it the /regserver parameter on the command line. You can do this by selecting Start ® Run, by creating a shortcut in Explorer, or by running the program within Delphi after you've entered a command-line parameter (using the Run ® Parameters command). Another command-line parameter, /unregserver, is used to remove this server from the Registry. Writing a Client for the ServerNow that you have built a server, you can prepare a client program to test it. This client can connect to the server either by using variants or by using the new type library. This second approach can be implemented manually or by using Delphi techniques for wrapping components around Automation servers. You'll try all these approaches. Create a new application—I've called it TLibCli—and import the server's type library, using the Project ® Import type library menu command of the Delphi IDE. This command shows the Import Type Library dialog box, visible in Figure 12.5. This dialog lists registered COM servers having a type library in the upper portion. You can add other projects to this list pressing the Add button and browsing for the proper file module. The lower portion of the Import Type Library dialog box shows some details of the selected library (such as the list of server objects) and about the type library import unit this dialog box is going to produce as you press the Create Unit button (or the Install button).
The type library import unit is named by Delphi after the type library, with an _TLB at the end. In this case the unit name is TlibdemoLib_TLB. I've already mentioned that one of the elements of this unit, generated also by the type library editor, is the creation class. I've shown you the interface of this class, but here is the implementation of the first of the two functions: class function CoFirstServer.Create: IFirstServer; begin Result := CreateComObject(Class_FirstServer) as IFirstServer; end; You can use it to create a server object (and possibly start the server application) on the same computer. As you can see in the code, the function is a shortcut for the CreateComObject call, which allows you to create an instance of a COM object if you know its GUID. As an alternative, you can use the CreateOleObject function, which requires as a parameter a ProgID, which is the registered name of the server. There is another difference between these two creation functions: CreateComObject returns an object of the IUnknown type, whereas CreateOleObject returns an object of the IDispatch type. In this example, let's use the CoFirstServer.Create shorthand. When you create the server object, you get as a return value an IFirstServer interface. You can use it directly or store it in a variant variable. Here is an example of the first approach: var MyServer: Variant; begin MyServer := CoFirstServer.Create; MyServer.ChangeColor; This code, based on variants, is not very different from that of the first controller you built in this chapter (the one that used Microsoft Word). Here is the alternate code, which has the same effect: var IMyServer: IFirstServer; begin IMyServer := CoFirstServer.Create; IMyServer.ChangeColor; You've already seen how you can use the interface and the variant. What about the dispatch interface? You can declare a variable of the dispatch interface type, in this case: var DMyServer: IFirstServerDisp; Then you can use it to call the methods as usual, after you've assigned an object to it by casting the object returned by the creator class: DMyServer := CoFirstServer.Create as IFirstServerDisp; As I mentioned in the section introducing type libraries, one of the differences between these approaches is speed. It is complicated to assess the exact performance of each technique because many factors are involved. I've added a simple test to the TLibCli example among the demos for this chapter, to give you an idea. The code for the test is a loop that accesses the Value of the server 100 times. The output of the program shows the timing, which is determined by calling the GetTickCount API function before and after executing the loop. (Two alternatives are to use Delphi's own time functions, which are slightly less precise, or to use the very precise timing functions of the multimedia support unit, MMSystem.) With this program, you can roughly compare the output obtained by calling this method based on an interface, the corresponding version based on a variant, and a third version based on a dispatch interface. Looking at the timing of the example, you should see that interfaces are quicker and variants are slower, with dispatch interfaces falling in between but closer to interfaces. The Scope of Automation ObjectsAnother important element to keep in mind is the scope of the Automation objects. Variants and interface objects use reference-counting techniques, so if a variable that is related to an interface object is declared locally in a method, then at the end of the method the object will be destroyed and the server may terminate (if all the objects created by the server have been destroyed). For example, writing a method with this code produces minimal effect: procedure TClientForm.ChangeColor; var IMyServer: IFirstServer; begin IMyServer := CoFirstServer.Create; IMyServer.ChangeColor; end; Unless the server is already active, a copy of the program is created and the color is changed, but then the server is immediately closed as the interface-typed object goes out of scope. The alternative approach I've used in the TLibCli example declares the object as a field of the form and creates the COM objects at startup, as in this procedure: procedure TClientForm.FormCreate(Sender: TObject); begin IMyServer := CoFirstServer.Create; end; With this code, as the client program starts, the server program is immediately activated. At program termination, the form field is destroyed and the server closes. A further alternative is to declare the object in the form, but then create it only when it is used, as in these two code fragments: // MyServerBis: Variant; if varType (MyServerBis) = varEmpty then MyServerBis := CoFirstServer.Create; MyServerBis.ChangeColor; // IMyServerBis: IFirstServer; if not Assigned (IMyServerBis) then IMyServerBis := CoFirstServer.Create; IMyServerBis.ChangeColor;
The Server in a ComponentWhen creating a client program for your server or any other Automation server, you can use a better approach: wrapping a Delphi component around the COM server. If you look at the final portion of the TlibdemoLib_TLB file, you can find the declaration of a TFirstServer class inheriting from TOleServer. This is a component generated when importing the library, which the system registers in the unit's Register procedure. If you add this unit to a package, the new server component will become available on the Delphi Component Palette (in the ActiveX page, by default). The generation of the code of this component is controlled by a check box at the bottom of the Import Type Library dialog box, already shown in Figure 12.5. I've created a new package, PackAuto, available in a directory having the same name. In this package, I added the directive LIVE_SERVER_AT_DESIGN_TIME in the Directories/Conditionals page of the package's Project Options dialog box. This directive enables an extra feature that you don't get by default: At design time, the server component will have an extra property that lists as subitems all the properties of the Automation server:  As you can see in the Object Inspector, the component has few properties. AutoConnect indicates when to activate the COM server. When the value is True the server object is loaded as soon as the wrapper component is created (both at runtime and design time). When the AutoConnect property is set to False, the Automation server is loaded only the first time one of its methods is called. Another property, ConnectKind, indicates how to establish the connection with the server. It can always start a new instance (ckNewInstance), use the running instance (ckRunningInstance, which shows an error message if the server is not already running), or select the current instance or start a new one if none is available (ckRunningOrNew). Finally, you can ask for a remote server with ckRemote and directly attach a server in the code after a manual connection with ckAttachToInterface.
COM Data TypesCOM dispatching doesn't support all the data types available in Delphi. This is particularly important for Automation, because the client and the server are often executed in different address spaces, and the system must move (or marshal) the data from one side to the other. Also keep in mind that COM interfaces should be accessible by programs written in any language. COM data types include basic data types such as Integer, SmallInt, Byte, Single, Double, WideString, Variant, and WordBool (but not Boolean). In addition to the basic data types, you can use COM types for complex elements such as fonts, string lists, and bitmaps, using the IFontDisp, IStrings, and IPictureDisp interfaces. The following sections describe the details of a server that provides a list of strings and a font to a client. Exposing Strings Lists and FontsThe ListServ example is a practical demonstration of how you can expose two complex types, such as a list of strings and a font, from an Automation server written in Delphi. I've chosen these two specific types because they are both supported by Delphi. The IFontDisp interface is provided by Windows and is available in the ActiveX unit. The AxCtrls Delphi unit extends this support by providing conversion methods like GetOleFont and SetOleFont. Delphi supports the IStrings interface in the StdVCL unit, and the AxCtrls unit provides conversion functions for this type (along with a third type I won't use here, TPicture).
The Set and Get methods of the complex types' properties copy information from the COM interfaces to the local data and from there to the form, and vice versa. The strings' two methods, for example, do this by calling the GetOleStrings and SetOleStrings Delphi functions. The client application used to demonstrate this feature is called ListCli. The two programs are complex; but rather than list their details here I've decided to leave the source code for your study, because Delphi programmers seldom use this advanced technique. Using Office ProgramsSo far, you've built both the client and the server side of the Automation connection. If your aim is just to let two applications you've built cooperate, this is a useful technique, although it is not the only one. You've seen the use of memory-mapped files in Chapter 10. (Another technique not covered in this edition of the book is the use of the wm_CopyData message.) The real value of Automation is that it is a standard, so you can use it to integrate your Delphi programs with other applications your users own. A typical example is the integration of a program with Office applications, such as Microsoft Word and Microsoft Excel, or even with stand-alone applications, such as AutoCAD. Integration with these applications provides a two-fold advantage:
This approach also has some drawbacks, which are worth mentioning:
Delphi simplifies the use of Microsoft Office applications by preinstalling some ready-to-use components that wrap the Automation interface of these servers. These components, available in the Servers page of the Palette, are installed using the same technique I demonstrated in the last section. The real plus lies in the technique of creating components to wrap existing Automation servers, rather than in the availability of predefined server components. Notice also that these Office components exist in different versions depending on your version of the Microsoft suite: All components are installed, but only one set is registered at design time, according to your choice in the Delphi install program. You can change this setting later by removing the related component package and adding a new one. You won't see an actual example in this section because it is very difficult to write a program that works with all of the different versions of Microsoft Office. You'll find same sample code and tips in Essential Delphi (see Appendix C for instructions on how to download this free ebook). |
|
|||||||||||||||||||||||||||||||||||||||||||||||||||||||||||||||||||||||||||||||||||||||||||||||||||||||||||||||||||||||||||||||||||||||||||||||||||||||||||||||||||||||||||||||||||||||||||||||||||||||||||||
|