|
|
|
Refactoring Your CodeRefactoring is one of those trendy terms in computer programming that is constantly bandied about, but that means different things to different people. Refactoring is basically the process of improving your existing code in place without altering its external behavior. There is no single refactoring process to which you must adhere—it's simply the task of trying to improve your code in place without breaking too much around it. Many texts are dedicated to the concept of refactoring, so I will simply look at some of the specific ways ModelMaker can assist you in refactoring your code. Again, ModelMaker's internal code model plays a big role—remember that developing in ModelMaker is not just development of object-oriented code; it's also a development process that is assisted by object orientation. Because all these code model elements are stored internally as objects—objects that have references to each other—and because source code units are completely regenerated from this model every time you choose to generate your code, any changes to the code elements are propagated throughout your classes instantly. The perfect example is again a class property. If you have a property named MyNewProperty with attending read/write methods (maintained by ModelMaker and named GetMyNewProperty and SetMyNewProperty), and you would like to rename the property MyProperty, doing so requires only one step: rename the property. ModelMaker takes care of the rest—the access methods are automatically renamed GetMyProperty and SetMyProperty. If the property appears in a diagram, the diagram is automatically updated to represent the change. (One caveat: ModelMaker will not automatically search your code for instances of MyNewProperty—you'll have to do this with a global search and replace within ModelMaker.) This is a simple example, but it illustrates how ModelMaker simplifies the task of refactoring; as you move and rename code elements, ModelMaker will handle the majority of the details for you. Now let's look at some specifics:
If you have experience in refactoring (or you are familiar with the latest versions of JBuilder), this may not seem like a particularly impressive set of refactoring tools. However, when compared to what is possible in Delphi alone, this is a wonderful collection of possibilities. In addition, ModelMaker's OpenTools API gives you access to most of the code model. If you're discontented with what ModelMaker offers out of the box, you can extend its refactoring capabilities on your own.
Applying Design PatternsModelMaker puts it all together impressively in its support of design patterns. (A full discussion of design patterns is beyond the scope of this chapter; however, if you're unfamiliar with patterns, see the sidebar "Design Patterns 101" for a short introduction.) ModelMaker provides the convenience of applying a pattern implementation with a single mouse click. Depending on the pattern you select, a variety of actions take place—some patterns display a wizard before adding code, and others simply add their members to the selected class. As I've discussed earlier, these new members are owned by ModelMaker and are easily updated as a result. In addition, should you choose to un-apply the pattern, ModelMaker removes any class members it added for that pattern. As an example, let's look at the Singleton pattern. Suppose you have a class and you want only one instance of it at most. Here is the sample class:
type
  TOneTimeData = class (TObject)
  private
    FGlobalCount: Integer;
    procedure SetGlobalCount(const Value: Integer);
  public
    property GlobalCount: Integer read FGlobalCount write SetGlobalCount;
  end;
The Singleton pattern mandates the use of a single entry point (the class function Instance in the ModelMaker implementation of this pattern, as seen next) to gain access to your single instance of the class. If the instance does not yet exist, it will be created and returned; otherwise the existing instance will be returned. Because Instance is the entry point, you'll disallow the use of Create for this class. Once you apply the Singleton pattern to your class in ModelMaker, it appears thus:
type
  TOneTimeData = class (TObject)
  private
    FGlobalCount: Integer;
    procedure SetGlobalCount(const Value: Integer);
  protected
    constructor CreateInstance;
    class function AccessInstance(Request: Integer): TOneTimeData;
  public
    constructor Create;
    destructor Destroy; override;
    class function Instance: TOneTimeData;
    class procedure ReleaseInstance;
    property GlobalCount: Integer read FGlobalCount write SetGlobalCount;
  end;
I won't list the method implementations here; you can look them up either by applying the pattern yourself, or by looking up the source code of the PatternDemo example.
Whereas programmers concentrate on implementing specific classes, designers are more focused on making different classes/objects work together. Although it is difficult to give a precise definition of software design, essentially it is the organization of the overall structure of a program. Looking at different people's design solutions to different problems, you can notice similarities and common elements. A pattern is the acknowledgement of such a common design, expressed in a standard way, and abstracted enough to be applicable in a number of different situations. Design patterns relate to design reuse more than code reuse. Although the coded solution of a pattern can be an inspiration to the programmer, the actual focus is in the design: Even if you might have to rewrite the code, starting with a clear and proven design will save you considerable time. Design patterns do not cover primitive building blocks (like a hash table or a linked list) or domain-specific problems (like analysis patterns do). The recognized originator of the pattern movement was not a software designer but an architect, who noticed the use of patterns in buildings. "Each pattern describes a problem which occurs over and over again in our environment, and then describes the core of the solution to that problem, in such a way that you can use the solution a million times over, without ever doing it the same way twice." Erich Gamma, Richard Helm, Ralph Johnson, and John Vlissides wrote the book that started the pattern movement in the software world: Design Patterns: Elements of Reusable Object-Oriented Software (Addison-Wesley, 1995). The authors are often indicated as "Gamma et al.," but are more frequently called the Gang of Four or simply GoF. The book is often colloquially referenced as the "GoF book." The book describes the notion of software patterns, indicates a precise way of describing them, and provides a catalog of 23 patterns divided into three groups: creational, structural, and behavioral. Most of the GoF patterns are implemented in C++, and some in Smalltalk, although they generally abstract the language and are equally applicable in Java or Delphi. The core structure of a pattern is the following:
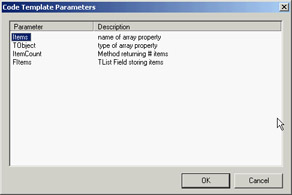
Currently, no book is devoted to patterns from the Delphi perspective. However, many articles have appeared in the Delphi magazines (including Delphi Informant and The Delphi Magazine). The classic GoF patterns have been a source of inspiration for many articles, along with the detailed discussion of patterns available with the ModelMaker documentation (see the website to download it). I don't always agree with the Delphi implementation of some standard patterns. In fact, I tend to focus on the underlying design and how it can be preserved while moving the GoF implementation (often in C++ or Java) to Delphi and leveraging its specific language features. Other authors tend to port the code, which is only a way to implement the design. Learning about patterns is important, because you'll develop a common jargon with other programmers and learn better ways to apply OOP techniques (particularly encapsulation and low coupling). As a final hint, consider that most patterns are better implemented in Delphi using interfaces rather than classes (as ModelMaker tends to do, following the classic approach). ModelMaker offers implementations of several other patterns, including Visitor, Observer, Wrapper, Mediator, and Decorator. They are hard-coded within ModelMaker to be applied a specific way, and some of the implementations are better than others. This has been a point of contention among some developers, and for that reason (among others) ModelMaker supports another means of applying patterns: code templates (discussed in the next section). This approach allows creation and customization on the part of the developer. However, don't overlook ModelMaker's extant support for patterns; they're quite good and offer a fixed, solid, working, Delphi-specific implementation of these common problems. Code TemplatesYet another powerful feature in ModelMaker (which is seemingly lost, tucked in among the myriad other conveniences) is code templates, a technique you can use to create your own implementations of design patterns. Code templates are like a snapshot of part of a class that can be applied to another class. In other words, it's a collection of class members, saved in a template that can be added to another class, en masse. Better still, these templates can be parameterized (much like macros) so that when you apply one to a class, a dialog will pop up to ask you to fill in certain values, which are then applied as part of the template. One example is an array property. Declaring an array property is simple in ModelMaker, but completely implementing one requires several steps: You must have not only the array property itself, but also a TList or descendant to contain the array elements, and a means of supplying a count of the stored elements. Even for this simple example, it takes a bit of work to get your array property up and running. Enter the array property template. Open a model in ModelMaker (or create a new model and add a TObject descendant) and select a class to which you'd like to add your new array property. Right-click in the Member List and select Code Templates. There should now be a floating toolbar named Code Templates (note that this same toolbar is available in the Patterns tab). Click the Apply Array Property Template button to open the Code Template Parameters dialog. It contains a list of items you can specify for the template that is about to be applied, as you can see in Figure 11.10. You can highlight any item in the left column and press F2 to edit the value for that parameter. Accept the defaults and click OK. Your class should now contain the following members: private FItems: TList; protected function GetItemCount: Integer; function GetItems(Index: Integer): TObject; public property ItemCount: Integer read GetItemCount; property Items[Index: Integer]: TObject read GetItems; You can see how flexible this technique can be. Other common tasks (like strongly typed lists) and your own implementations of design patterns are easily implemented; let's see how. To create your own code template, begin with an existing class that already has the members you wish to turn into a template. Select that class, and then, in the Member List, select the members you wish to use (these can be any type of member). Right-click in the Member List and select Create Code Template; the Save Code Template dialog will appear. It is much like a standard Save As dialog (and you do specify where to save the template), but you can also detail how you'd like the template to appear. Specify a name for the template and on which page of the template palette you wish it to appear. Take note of the resulting confirmation message; you can change the palette bitmap if you wish. Your new template is now available in the template palette; you can add this template to any class. To parameterize your template, you must alter the PAS file that was created when you saved the template. For example, here is part of the ArrayProp_List.pas file used for the Array Property template:
unit ArrayProp_List;

//DEFINEMACRO:Items=name of array property
//DEFINEMACRO:TObject=type of array property
//DEFINEMACRO:ItemCount=Method returning # items
//DEFINEMACRO:FItems=TList Field storing items

  TCodeTemplate = class (TObject)
  private
    <!FItems!>: TList;
  protected
    function Get<!ItemCount!>: Integer;
    function Get<!Items!>(Index: Integer): <!TObject!>;
  public
    property <!ItemCount!>: Integer read Get<!ItemCount!>;
    property <!Items!>[Index: Integer]: <!TObject!> read Get<!Items!>;
  end;
Notice the lines that begin with //DEFINEMACRO. This is where you declare your parameters; they will appear in the Code Template Parameters dialog you saw earlier. Each line is a Name/ Value pair: the element on the left of the = is the editable value, and the element on the right is a description you can provide to explain the parameter. After you supply a list of parameters, they can be used as macros in your template code. Note in the example lines like this: property <!Items!>[Index: Integer]: <!TObject!> read Get<!Items!>; When this property is added to a class as part of the template, the macros (things like <!Items!>) will be replaced with the value of the appropriate parameter. In this way, you can use parameters to deeply customize your code templates. |
|
||||||||||||||||||||||||||||||||||||||||||||||||||||||||||||||||||||||||||||||||||||||||||||||||||||||||||||||||||||||||||||||||||||||||||||||||||||||||||||||||||||||||||||||||||||||||||||||
|