|
|
|
The Delphi EditorOn the surface, Delphi's editor doesn't appear to have changed much for version 7 of the IDE. However, behind the scenes, it is a totally new tool. Besides using it to work on files in the Object Pascal language (or the Delphi language, as Borland prefers to call it now), you can now use it to work on other files used in Delphi development (such as SQL, XML, HTML, and XSL files), as well as files in other languages (including C++ and C#). XML and HTML editing was already available in Delphi 6, but the changes in this version are significant. For example, while editing an HTML file, you have support for both syntax highlighting and code completion. The editor settings used on each file (including the behavior of keys like Tab) depend on the extension of the file being opened. You can configure these settings in the new Source Options page of the Editor Properties dialog box, displayed in Figure 1.4. This feature has been extended and made more open, so you can even configure the editor by providing a DTD for XML-based file formats or by writing a custom wizard that provides syntax highlighting for other programming languages. Another feature of the editor, code templates, is now language specific (your predefined Delphi templates will make little sense in HTML or C#). 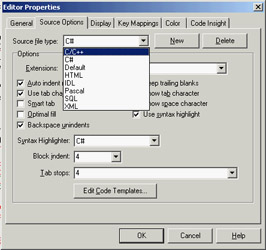
Figure 1.4: The multiple languages supported by the Delphi IDE can be associated with various file extensions in the Source Options page of the Editor Properties dialog box.
Considering only the Delphi language, the editor included in the IDE hasn't changed much in recent versions. However, it has a few features that many Delphi programmers don't know about and use, so I think it's worth a brief examination. The Delphi editor allows you to work on several files at once, using a "notebook with tabs" metaphor. You can jump from one page of the editor to the next by pressing Ctrl+Tab (or Ctrl+Shift+Tab to move in the opposite direction). You can drag-and-drop the tabs with the unit names in the upper portion of the editor to change their order, so that you can use a single Ctrl+Tab to move between the units you are working on any given time. The editor's shortcut menu has also a Pages command, which lists all the available pages in a submenu (a handy feature when many units are loaded). You can also open multiple editor windows, each hosting multiple tabs. Doing so is the only way to see the source code of two units alongside each other. (Actually, when I need to compare two Delphi units, I invariably use Beyond Compare—www.scootersoftware.com—a superb, low-cost file comparison utility written in Delphi.) Several options affect the editor, as you can see in the Editor Properties dialog box in Figure 1.4. However, you have to go to the Preferences page of the Environment Options dialog box (see Figure 1.2) to set the editor's AutoSave feature. This option forces the editor to save all of your source code files each time you run the program, preventing data loss in the (rare) case the program crashes badly in the debugger. Delphi's editor provides many commands, including some that date back to its WordStar emulation ancestry (of the early Turbo Pascal compilers). I won't discuss the various settings of the editor, because they are quite intuitive and are described in the online help. Notice, though, that the page of the help describing the keyboard shortcuts is accessible as a whole only if you look up the shortcuts index item.
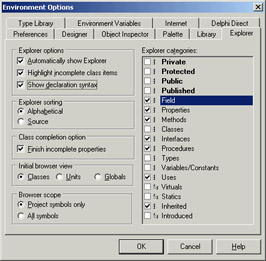
The Code ExplorerThe Code Explorer window, which is generally docked on the side of the editor, lists all the types, variables, and routines defined in a unit, plus other units appearing in uses statements. For complex types, such as classes, the Code Explorer can list detailed information, including a list of fields, properties, and methods. All the information is updated as soon as you begin typing in the editor. You can use the Code Explorer to navigate in the editor. If you double-click one of the entries in the Code Explorer, the editor jumps to the corresponding declaration. You can also modify variables, properties, and method names directly in the Code Explorer. However, as you'll see, if you want a visual tool to use when you work on your classes, ModelMaker provides many more features. Although all this functionality is obvious after you've used Delphi for a few minutes, some features of the Code Explorer are not so intuitive. You have full control of the information layout. And, you can reduce the depth of the tree usually displayed in this window by customizing the Code Explorer (collapsing the tree can help you make your selections more quickly). You can configure the Code Explorer by using the corresponding page of the Environment Options, as shown in Figure 1.5. Notice that when you deselect one of the Explorer Categories items on the right side of this page of the dialog box, the Explorer doesn't remove the corresponding elements from view—it simply adds the node in the tree. For example, if you deselect the Uses check box, Delphi doesn't hide the list of the used units from the Code Explorer; on the contrary, the used units are listed as main nodes instead of being kept in the Uses folder. I generally disable the Types, Classes, and Variables/Constants selections. Because each item of the Code Explorer tree has an icon marking its type, arranging by field and method seems less important than arranging by access specifier. My preference is to show all items in a single group, because this arrangement requires the fewest mouse clicks to reach each item. Selecting items in the Code Explorer provides a handy way of navigating the source code of a large unit—when you double-click a method in the Code Explorer, the focus moves to the definition in the class declaration. You can use Module Navigation (the Ctrl+Shift combination with the Up or Down arrow key) to jump from the definition of a method or procedure to its complete definition (or back again).
Browsing in the EditorAnother feature of the editor is Tooltip symbol insight. Move the mouse over a symbol in the editor, and a Tooltip will show you where the identifier is declared. This feature can be particularly important for tracking identifiers, classes, and functions within an application you are writing, and also for referring to the source code of the library.
The real bonus of this feature, however, is that you can turn it into a navigational aid called code browsing. When you hold down the Ctrl key and move the mouse over the identifier, Delphi creates an active link to the definition instead of showing the Tooltip. These links are displayed with the blue color and underline style that are typical of links in web browsers, and the pointer changes to a hand whenever it's positioned on the link. For example, you can Ctrl+click the TLabel identifier to open its definition in the VCL source code. As you select references, the editor keeps track of the various positions you've jumped to, and you can move backward and forward among them—again, as in a web browser—using the Browse Back and Browse Forward buttons in the top-right corner of the editor windows or the keystrokes Alt+Left arrow or Alt+Right arrow. You can also click the drop-down arrows near the Back and Forward buttons to view a detailed list of the lines of the source code files you've already jumped to, for more control over the backward and forward movement. How can you jump directly to the VCL source code if it is not part of your project? The editor can find not only the units in the Search path (which are compiled as part of the project), but also those in Delphi's Debug Source, Browsing, and Library paths. These directories are searched in the order I've just listed, and you can set them in the Directories/ Conditionals page of the Project Options dialog box and in the Library page of the Environment Options dialog box. By default, Delphi adds the VCL source code directories in the Browsing path of the environment. Class CompletionDelphi's editor can also help by generating some source code for you, completing what you've already written. This feature is called class completion, and you activate it by pressing the Ctrl+Shift+C key combination. Adding an event handler to an application is a fast operation, because Delphi automatically adds the declaration of a new method to handle the event in the class and provides you with the skeleton of the method in the implementation portion of the unit. This is part of Delphi's support for visual programming. Newer versions of Delphi simplify life in a similar way for programmers who write a little extra code behind event handlers. This code-generation feature applies to general methods, message-handling methods, and properties. For example, if you type the following code in the class declaration public procedure Hello (MessageText: string); and then press Ctrl+Shift+C, Delphi will provide you with the definition of the method in the implementation section of the unit, generating the following lines of code:
{ TForm1 }
procedure TForm1.Hello(MessageText: string);
begin
end;
This feature is really handy compared with the traditional approach of many Delphi programmers, which is to copy and paste one or more declarations, add the class names, and finally duplicate the begin...end code for every method copied. Class completion also works the other way around: You can write the implementation of the method with its code directly, and then press Ctrl+Shift+C to generate the required entry in the class declaration. The most important and useful example of class completion is the automatic generation of code to support properties declared in classes. For example, if you type in a class property Value: Integer; and press Ctrl+Shift+C, Delphi will turn the line into property Value: Integer read fValue write SetValue; Delphi will also add the SetValue method to the class declaration and provide a default implementation for it. You'll find more on properties in the next chapter. Code InsightIn addition to the Code Explorer, class completion, and the navigational features, the Delphi editor supports the code insight technology. Collectively, the code insight techniques are based on a constant background parsing of both the source code you write and the source code of the system units your source code refers to. Code insight comprises five capabilities: code completion, code templates, code parameters, Tooltip expression evaluation, and Tooltip symbol insight. This last feature was already covered in the section "Browsing in the Editor"; the other four are discussed in the following subsections. You can enable, disable, and configure each of these features in the Code Insight page of the Editor Properties dialog box. Code CompletionCode completion allows you to choose the property or method of an object simply by looking it up on a list or by typing its initial letters. To activate this list, you just type the name of an object, such as Button1, then add the dot, and wait. To force the display of the list, press Ctrl+spacebar; to remove it when you don't want it, press Esc. Code completion also lets you look for a proper value in an assignment statement. As you begin typing, the list filters its content according to the initial portion of the element you've inserted. The code completion list uses colors and shows more details to help you distinguish different items. In Delphi, you can customize these colors in the Code Insight page of the Editor Options dialog box. Another feature is that in the case of functions with parameters, parentheses are included in the generated code, and the parameters list hint is displayed immediately. As you type := after a variable or property, Delphi will list all the other variables or objects of the same type, plus the objects having properties of that type. While the list is visible, you can right-click it to change the order of the items, sorting either by scope or by name; you can also resize the window. Since Delphi 6, code completion also works in the interface section of a unit. If you press Ctrl+spacebar while the cursor is inside the class definition, you'll get a list of virtual methods you can override (including abstract methods), the methods of implemented interfaces, the base class properties, and eventually system messages you can handle. Simply selecting one of them will add the proper method to the class declaration. In this particular case, the code completion list allows multiple selection.
Code completion includes some advanced features that aren't easy to spot. One that I find particularly useful relates to the discovery of symbols in units not used by your project. As you invoke it (with Ctrl+spacebar) over a blank line, the list also includes symbols from common units (such as Math, StrUtils, and DateUtils) not already included in the uses statement of the current unit. By selecting one of these external symbols, Delphi adds the unit to the uses statement for you. This feature (which doesn't work inside expressions) is driven by a customizable list of extra units, stored in the Registry key \Delphi\7.0\CodeCompletion\ExtraUnits.
Code TemplatesThis feature lets you insert one of the predefined code templates, such as a complex statement with an inner begin...end block. Code templates must be activated manually, by pressing Ctrl+J to show a list of all of the templates. If you type a few letters (such as a keyword) before pressing Ctrl+J, Delphi will list only the templates starting with those letters. You can add custom code templates, so that you can build your own shortcuts for commonly used blocks of code. For example, if you use the MessageDlg function often, you might want to add a template for it. To modify templates, go to the Source Options page of the Editor Options dialog box, select Pascal from the Source File Type list, and click the Edit Code Templates button. Doing so opens the new Delphi 7 Code Templates dialog box. At this point, click the Add button, type in a new template name (for example, mess), type a description, and then add the following text to the template body in the Code memo control: MessageDlg ('|', mtInformation, [mbOK], 0);
Now, every time you need to create a message dialog box, you simply type mess and then press Ctrl+J, and you get the full text. The vertical line (or pipe) character indicates the position within the source code where the cursor will be in the editor after you expand the template. You should choose the position where you want to begin typing to complete the code generated by the template. Although code templates might seem at first to correspond to language keywords, they are a more general mechanism. They are saved in the DELPHI32.DCI file, a text file in a rather simple format that you can edit directly. Delphi 7 also allows you to export the settings for a language to a file and import them, making it easier for developers to exchange their own customized templates. Code ParametersWhile you are typing a function or method, code parameters display the data type of the function's or method's parameters in a hint or Tooltip window. Simply type the function or method name and the open (left) parenthesis, and the parameter names and types appear immediately in a pop-up hint window. To force the display of code parameters, you can press Ctrl+Shift+spacebar. As a further help, the current parameter appears in bold type. Tooltip Expression EvaluationTooltip expression evaluation is a debug-time feature. It shows you the value of the identifier, property, or expression that is under the mouse cursor. In the case of an expression, you typically need to select it in the editor and then move the mouse over the highlighted text. More Editor Shortcut KeysThe editor has many more shortcut keys that depend on the editor style you've selected. Here are a few of the lesser-known shortcuts:
Loadable ViewsAnother important feature introduced in Delphi 6 is support for multiple views in the editor. For any single file loaded in the IDE, the editor can show multiple views, defined programmatically and added to the system, and then loaded for given files—hence the name loadable views. The most frequently used view is the Diagram page, which was available in Delphi 5 data modules, although it was less powerful. Another set of views is available in web applications, including an HTML Script view, an HTML Result preview, and many others discussed in Chapters 20 ("Web Programming with WebBroker and WebSnap") and 22 ("Using XML Technologies"). You can press the Alt+Page Down and Alt+Page Up key combinations to cycle through the bottom tabs of this editor; Ctrl+Tab changes the pages (or files) shown in the upper tabs. The Diagram ViewThe Diagram view shows dependencies among components, including parent/child relations, ownership, linked properties, and generic relations. For dataset components, it also supports master/detail relations and lookup connections. You can even add your comments in text blocks linked to specific components. The diagram is not built automatically. You must drag components from the Tree view to the diagram, which will automatically display the existing relations among the components you drop there. You can select multiple items from the Object TreeView and drag them all at once to the Diagram page. What's nice is that you can set properties by simply drawing arrows between the components. For example, after moving an edit and a label to the diagram, you can select the Property Connector icon, click the label, and drag the mouse cursor over the edit. When you release the mouse button, the Diagram view will set up a property relation based on the FocusControl property, which is the only property of the label referring to an edit control. This situation is depicted in Figure 1.6. 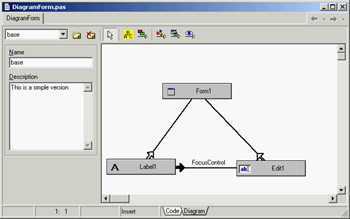
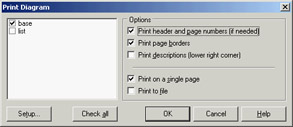
Figure 1.6: The Diagram view shows relationships among components (and even allows you to set them up). As you can see, setting properties is directional: If you drag the property relation line from the edit to the label, you end up trying to use the label as the value of a property of the edit box. Because this isn't possible, you'll see an error message indicating the problem and offering to connect the components in the opposite way. The Diagram view allows you to create multiple diagrams for each Delphi unit—that is, for each form or data module. You give a name to the diagram and possibly add a description, click the New Diagram button, prepare another diagram, and you'll be able to switch back and forth between diagrams using the combo box available in the toolbar of the Diagram view. Although you can use the Diagram view to set up relations, its main role is to document your design. For this reason, it is important to be able to print the content of this view. Use the standard File ® Print command while the Diagram view is active, and Delphi prompts you for options as shown in Figure 1.7. You can customize the output in many ways. The information in the Diagram view is saved in a separate file, not as part of the DFM file. Delphi 5 used design-time information (DTI) files, which had a structure similar to INI files. Delphi 6 and 7 can still read the older .DTI format, but they use the new Delphi Diagram Portfolio format (.DDP). These files use the DFM binary format (or a similar format), so they are not editable as text. All of these files are obviously useless at run time (it makes no sense to include them in the compilation of the executable file).
|
|
||||||||||||||||||||||||||||||||||||||||||||||||||||||||||||||||||||||||||||||||||||||||||||||||||||||||||||||||||||||||||||||||||||||||||||||||||||||||||||||||||||||||||||||||||||||||||||||||||||||||||
|